Last Updated: December 15 2025
Overview
Pre-builds can combine materials and labour, materials only, or labour only as a single billable item to appear on jobs, quotes and invoices. The two main types are standard price pre-builds and flat rate pre-builds, which you can adapt as required by adding images, supporting documentation like brochures, and other attachments.
You can use pre-builds for many functions, including:
- assemblies
- schedules of rates
- What are Contractor Pre-Builds
- What are Maintenance Pre-Builds
- AU only: What are Renewable Energy Pre-Builds
- What are Renewable Energy Pre-Builds
Pre-builds can also be a useful feature for your customers who use the customer portal, so they can select the work they need done from a list of pre-builds, for example 'Install double powerpoint', when they request a quote or book a job through the portal. Learn more in How to Set Up the Customer Portal.
Before creating pre-builds you need to create pre-build groups. Learn more in How to Create a Pre-Build Group.
To create pre-builds in bulk, read How to Import Pre-Builds. If you use Simpro Premium in Australia and you use Espro to estimate your projects, see Supplier requirements to learn how to import Espro pre-builds into Simpro Premium.
Flat price pre-builds are also referred to as set price pre-builds in some industries.
You need to have the applicable security group permissions enabled to view and edit pre-build details and pricing. Learn more in Pre-build security group permissions.
 Required setup
In order to view content or perform actions referred to in this article you need to have the appropriate permissions enabled in your security group. Go to System![]() > Setup > Security Groups and access your security group to update your permissions. The relevant security group tab and specific permissions for this article can be found here:
> Setup > Security Groups and access your security group to update your permissions. The relevant security group tab and specific permissions for this article can be found here:
Before performing the steps detailed below, ensure that this part of your build is set up correctly. The relevant steps to set up the features and workflows detailed in this article can be found here:
Create a pre-build
You can create standard price or flat rate pre-builds in Simpro Premium.
Standard price pre-builds calculate their sell price based on the individual costs involved, including materials, labour, and associated markup. The price of these individual components can be changed to affect the total price.
Flat rate price pre-builds have a pre-determined sell price, regardless of the material and labour costs involved. These pre-builds are commonly used for creating a schedule of rates, in maintenance-related pre-builds ![]() .
.
You cannot change a pre-build's Pricing Type after it has been used on a quote or job.
Create a standard price pre-build
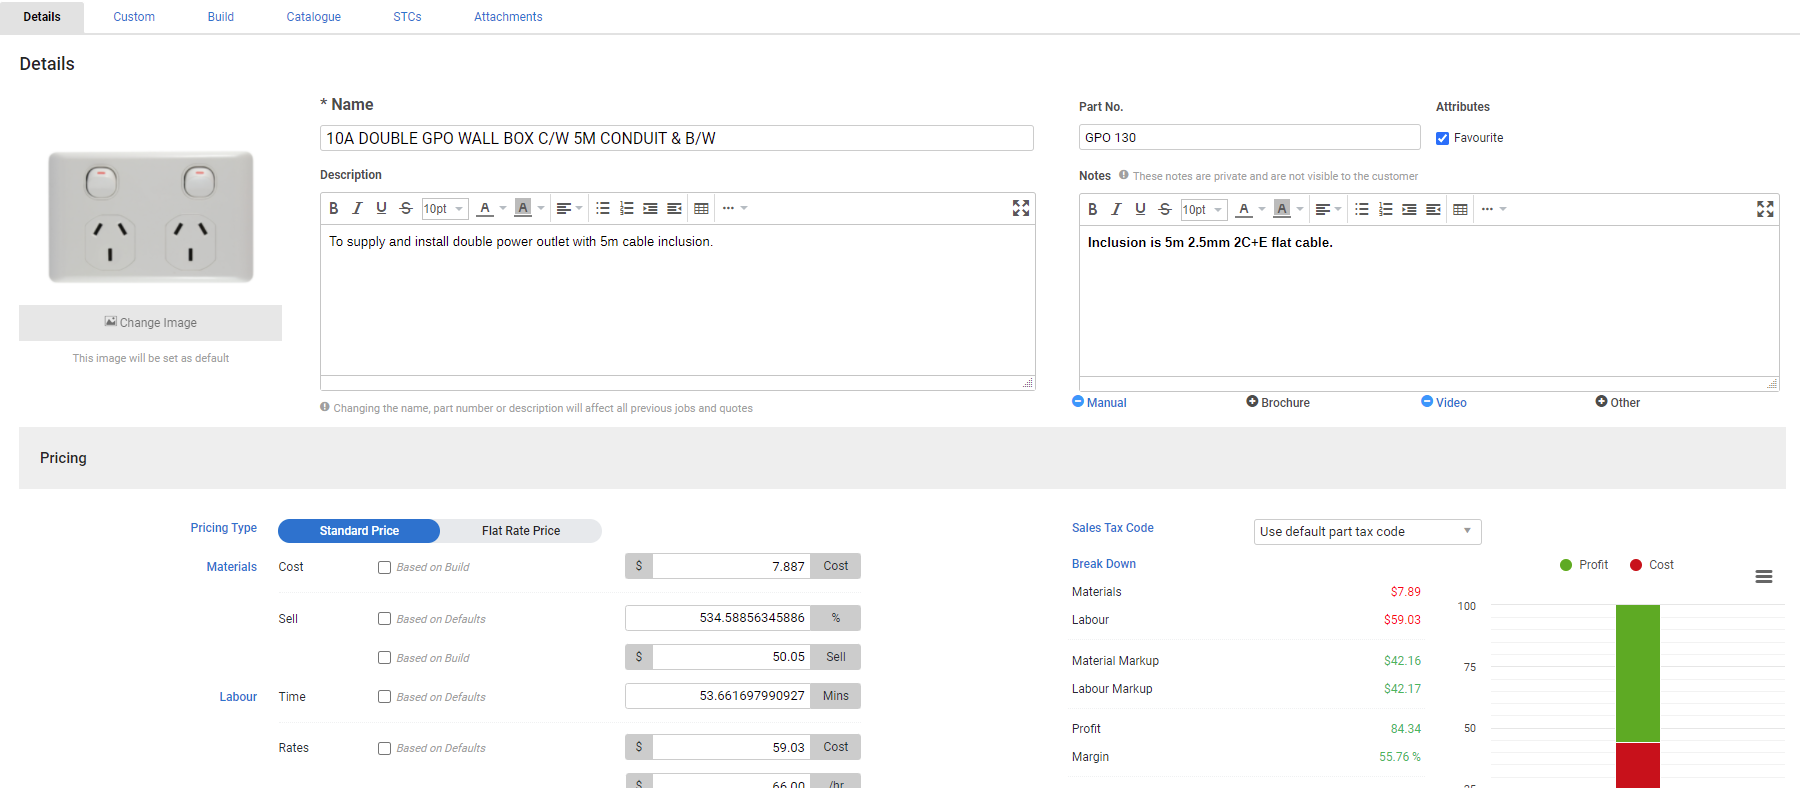
To create a standard price pre-build:
- Go to Materials
 > Pre-Builds.
 - Create or access the group or subgroup where you wish to create the pre-build. Learn more in How to Create a Pre-Build Group.
- Click Create Pre-Build.
- Enter the pre-build Name and Part No. if required.
- Select Favourite under Attributes.
- The Favourite group makes it easier to locate pre-builds when you are adding them to quotes, jobs, take off templates, recurring invoices, Takeoffs and when searching through materials.
- Click Browse or drag an image to appear as the default image for the pre-build.
- This image is added to the Attachments tab, and can be a PNG, JPG, JPEG, BMP, GIF, or TIFF file. To update the default image, click Change Image in the Details tab, or select Default image in the Attachments tab to update it to an existing image attachment.
- If your image is too wide it may look distorted when uploaded. Try to use a square image if possible.
- Enter a Description of the pre-build using the text formatting options.
- This is useful for providing additional detail in a scope of works and can be enabled to appear without formatting on itemised quote, job, and invoice forms. To learn how to enable / disable pre-build descriptions from appearing on forms, see How to Set Up Quote Forms / How to Set Up Job Forms / How to Set Up Invoice Forms.
- Pre-build descriptions also appear in the customer, contractor, and employee portals.
- Enter Notes for internal reference only and Add pre-build support materials such as a manual, brochure, or video.
- Next to Pricing Type, select Standard Price.
- Set up material and labour prices for standard price pre-builds.
- Select the Sales Tax Code.
- Review the Break Down graph. You can then:
- Click Save and Finish.
Once you have created a pre-build, you need the relevant permissions enabled in your security group to view and / or edit pre-build details and / or pricing. Learn more in Pre-build security group permissions.
Add pre-build support materials
You can add support materials to a pre-build such as a manual, brochure, video, or other material to assist in installing or upselling to the customer.
To add a support material:
- Create a pre-build as normal.
- Click Add Support Material below the Notes field.
- Click the type of material you wish to add, then click:
- URL to enter a web address beginning with 'http://' or 'https://'.
- Existing to select from any materials already added in the Attachments tab of the pre-build.
- Upload to locate the material on your computer.
- Click Save.
- Click Save and Finish.
You can then click the blue material type to access the material in the pre-build.
To remove a support material from the Details tab, click the ![]() icon to the left of the material type. If the material type is a URL, this deletes the material from the pre-build completely. If the material type was uploaded or linked from an existing attachment, it remains in the Attachments tab.
icon to the left of the material type. If the material type is a URL, this deletes the material from the pre-build completely. If the material type was uploaded or linked from an existing attachment, it remains in the Attachments tab.
Set up material and labour prices for standard price pre-builds
You can select from the following options for your standard price pre-build material pricing:
| Cost |
Select Based on Build to make the pre-build's Material Cost in the Break Down the total cost of all items in the Build tab. Learn more in Confirm prices and build time. This allows catalogue price updates to reflect in the pre-build. Alternatively, clear the check box to enter a Cost price. |
| Sell |
Select Based on Defaults to set the pre-build's material markup according to system defaults. If the pre-build is then used in a quote or job where the customer has a different material markup as specified in their card file, that markup reflects in the pre-build. Clear the check box to enter a new markup percentage. Select Based on Build, to apply pricing tiers to the individual items in the Build tab to determine the pre-build's markup and sell value. Learn more in About Pricing Tiers and Pre-Builds. Clear the check box to enter a Sell price. |
You can select from the following options for your standard price pre-build labour pricing:
| Time |
Select Based on Defaults to make the pre-build's labour time a total of the estimated fit times associated with the individual items in the Build tab. Alternatively, clear the check box to enter the labour time in Minutes. |
| Rates |
Select Based On Defaults to calculate the pre-build labour sell price according to your default labour rate in System Although the pre-build itself display a combined material and labour sell price, when it is added to a quote or job, it displays the sell price of the included materials only. The sell price of the labour for that pre-build is separated out into the labour rates used on the quote or job. Clear the Based on Defaults check box to manually enter the pre-build labour Cost price, hourly labour rate, markup %, and Sell price. The pre-build sell price on a quote or job is then the combined sell price of the materials and labour. |
Select a pre-build sales tax code
If you are working in countries or states with differing tax codes you may wish to select pre-build sales tax codes on your pre-build:
- For materials-only pre-builds, select Use default part tax code to apply the tax code marked as Part Income Default in System
 > Setup > System Setup > Accounts > Tax Codes to ensure any changes made to the tax code are reflected in the pre-build. Alternatively, select a specific materials tax code.
 - For labour-only pre-builds, select Use default labour tax code to apply the tax code marked as Labour Income Default in System > Setup > System Setup > Accounts > Tax Codes to ensure any changes made to the tax code are reflected in the pre-build. Alternatively, select a specific labour tax code.
- If your pre-build includes both materials and labour, select any tax code but ensure you check and update tax codes per line item in each quote or job as required.
Learn more in How to Use Tax Codes.
Enable add-on pricing
Enable add-on pricing in pre-builds so you can offer reduced pricing when they are added after a job is in progress.
To enable add-on pricing:
- At the bottom of the Details tab, click the Add-on Price switch to turn add-on pricing ON.
- If necessary, clear the Based on Build check boxes.
- Update the Add-on Materials and Add-on Labour pricing as required.
- Click Save and Finish.
When you add this pre-build to a quote or job, you have the option to use regular pricing or add-on pricing. Learn more in Use add-on pricing in a service quote and Use add-on pricing in a service job.
Create a flat rate price pre-build
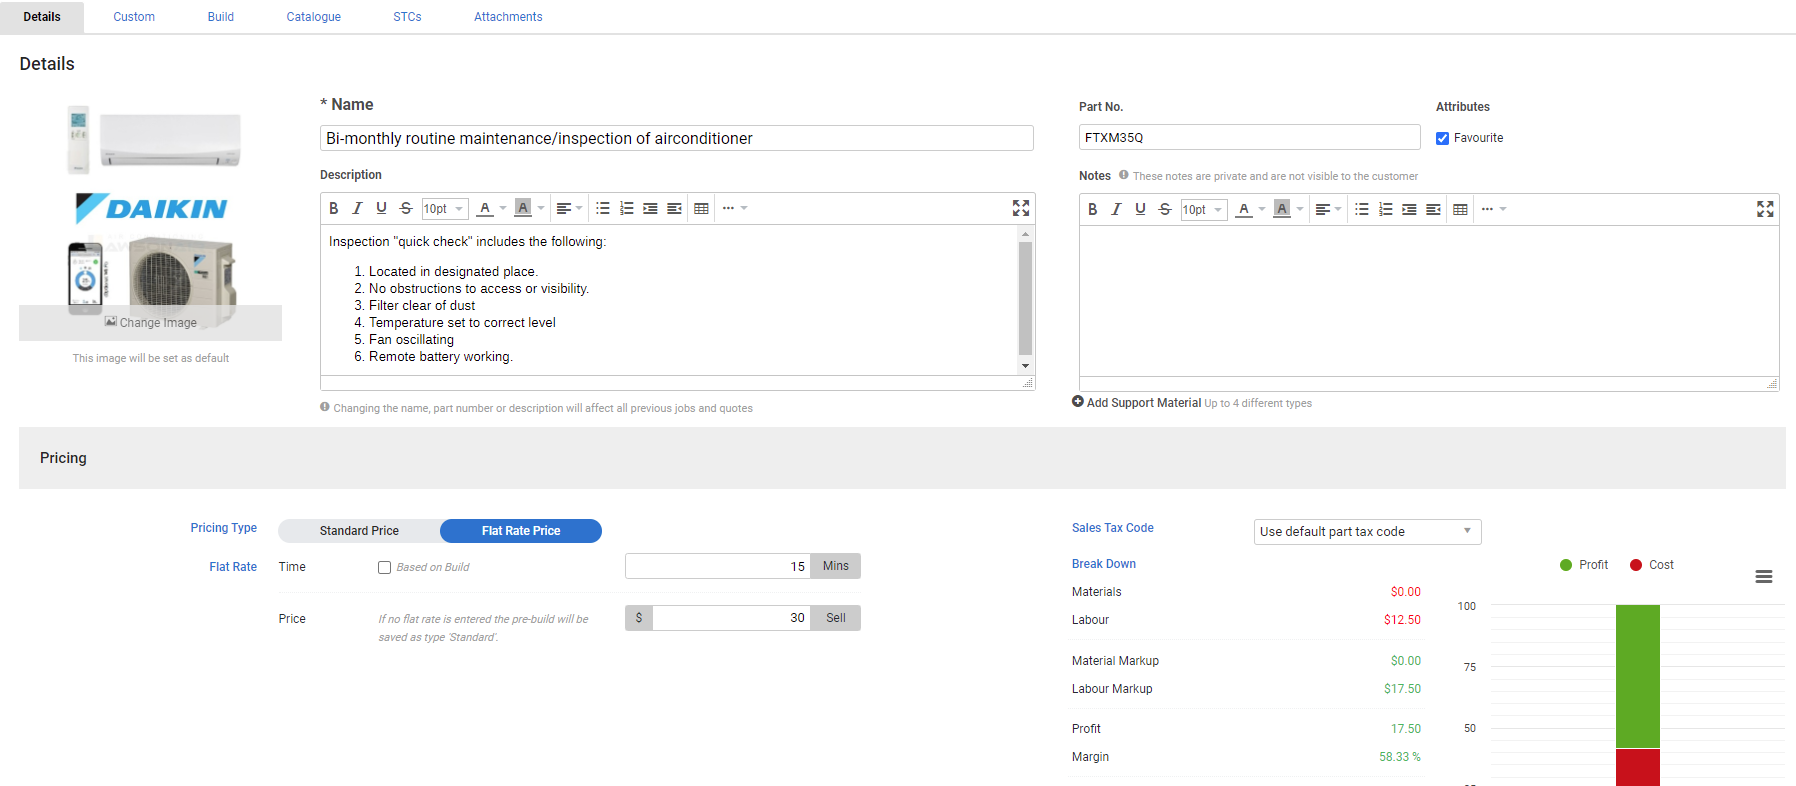
To create a flat rate pre-build:
- Go to Materials > Pre-Builds.
- Create or access the group or subgroup where you wish to create the pre-build. Learn more in How to Create a Pre-Build Group.
- Click Create Pre-Build.
- Enter the pre-build Name and Part No. if required.
- Select Favourite under Attributes.
- The Favourite group makes it easier to locate pre-builds when you are adding them to quotes, jobs, take off templates, recurring invoices, Takeoffs and when searching through materials.
- Click Browse or drag an image to appear as the default image for the pre-build.
- This image is added to the Attachments tab, and can be a PNG, JPG, JPEG, BMP, GIF, or TIFF file. To update the default image, click Change Image in the Details tab, or select Default image in the Attachments tab to update it to an existing image attachment.
- If your image is too wide it may look distorted when uploaded. Try to use a square image if possible.
- Enter a Description of the pre-build using the text formatting options.
- This is useful for providing additional detail in a scope of works and can be enabled to appear without formatting on itemised quote, job, and invoice forms. To learn how to enable / disable pre-build descriptions from appearing on forms, see How to Set Up Quote Forms / How to Set Up Job Forms / How to Set Up Invoice Forms.
- Pre-build descriptions also appear in the customer, contractor, and employee portals.
- Enter Notes for internal reference only and Add pre-build support materials such as a manual, brochure, or video.
- Select the Sales Tax Code.
- Review the Break Down graph. You can then:
- Click Save and Finish.
Once you have created a pre-build, you need the relevant permissions enabled in your security group to view and / or edit pre-build details and / or pricing. Learn more in Pre-build security group permissions.
Add pre-build support materials
You can add support materials to a pre-build such as a manual, brochure, video, or other material to assist in installing or upselling to the customer.
To add a support material:
- Create a pre-build as normal.
- Click Add Support Material below the Notes field.
- Click the type of material you wish to add, then click:
- URL to enter a web address beginning with 'http://' or 'https://'.
- Existing to select from any materials already added in the Attachments tab of the pre-build.
- Upload to locate the material on your computer.
- Click Save.
- Click Save and Finish.
You can then click the blue material type to access the material in the pre-build.
To remove a support material from the Details tab, click the ![]() icon to the left of the material type. If the material type is a URL, this deletes the material from the pre-build completely. If the material type was uploaded or linked from an existing attachment, it remains in the Attachments tab.
icon to the left of the material type. If the material type is a URL, this deletes the material from the pre-build completely. If the material type was uploaded or linked from an existing attachment, it remains in the Attachments tab.
Select a pre-build sales tax code
If you are working in countries or states with differing tax codes you may wish to select pre-build sales tax codes on your pre-build:
- For materials-only pre-builds, select Use default part tax code to apply the tax code marked as Part Income Default in System > Setup > System Setup > Accounts > Tax Codes to ensure any changes made to the tax code are reflected in the pre-build. Alternatively, select a specific materials tax code.
- For labour-only pre-builds, select Use default labour tax code to apply the tax code marked as Labour Income Default in System > Setup > System Setup > Accounts > Tax Codes to ensure any changes made to the tax code are reflected in the pre-build. Alternatively, select a specific labour tax code.
- If your pre-build includes both materials and labour, select any tax code but ensure you check and update tax codes per line item in each quote or job as required.
Learn more in How to Use Tax Codes.
Enable add-on pricing
Enable add-on pricing in pre-builds so you can offer reduced pricing when they are added after a job is in progress.
To enable add-on pricing:
- At the bottom of the Details tab, click the Add-on Price switch to turn add-on pricing ON.
- If necessary, clear the Based on Build check box.
- Update the Add-on Materials and Add-on Labour pricing as required.
- Click Save and Finish.
When you add this pre-build to a quote or job, you have the option to use regular pricing or add-on pricing. Learn more in Use add-on pricing in a service quote and Use add-on pricing in a service job.
Add catalogue items to a pre-build
To add catalogue items to a pre-build:
- Create or access a pre-build as normal.
- Click the Catalogue tab.
- Use the Search bar to locate the item, or click to access the relevant groups and subgroups.
- Locate the item, then enter the required quantity and click Add Items.
- Repeat as necessary.
- Click Save to update your changes, or click Finish to save and exit the pre-build.
- Alternatively, click the Build tab to Confirm prices and build time.
Confirm prices and build time
To confirm the included items and build time in a pre-build:
- Create or access a pre-build as normal.
- Click the Build tab.
- Review and edit the Qty for each time as required.
- To completely remove an item, click the
 icon.
icon.
- To completely remove an item, click the
- If you selected the Cost or Sell prices to be Based on Build in the Details tab, ensure the prices in this tab are accurate.
- Ensure the Time (Mins) is accurate.
- To edit or add time for an item, click the item, enter an Estimated Time, then click Finish to close the pop-up window.
- Select a Fit Time from the drop-down list to suit your pre-build as required.
- Click Save to update your changes, or click Finish to save and exit the pre-build.
AU only: Set up pre-build STCs or VEECs
You can associate pre-builds with any STCs or VEECs you have enabled and configured in the System Defaults.
You can then add these pre-builds to an installation job and see how many STC / VEEC credits are applied to that installation, as well as the energy credit value (EC value).
To set up STCs, you need to allocate a number of STCs to each zone on the relevant pre-build. When the pre-build is applied to a job, the job site is associated with one of those zones. The number of STCs allocated to the relevant zone is then multiplied by the STCs Value set up in your financial defaults and subtracted from the cost centre summary price. Learn more in How to Set Up Financial Defaults.
Learn more about associating pre-builds with STCs and VEECs in What are Renewable Energy Pre-Builds.
For information about setting up STCs, see How to Set Up STCs - AU Only.
Add attachments to a pre-build
To add attachments to a pre-build, such as a product image, access or create a pre-build as normal, then click the Attachments tab to Add an attachment. Click Save and Finish.
You can add a default image and existing attachments as supporting materials in the Details tab. Learn more in Create a pre-build.
Edit a pre-build
You need to have the View / Edit Pre-Builds permission enabled in your security group to edit pre-builds. You can only edit pricing if you have enabled Edit Pre-Builds > Details and Pricing. Learn more in Pre-build security group permissions.
To edit a pre-build:
- Go to Materials > Pre-Builds.
- Locate and open the pre-build.
- Make changes as required.
- Click Save and Finish.
If you need to edit a pre-build with history, it is recommended to make a copy of it first by clicking Options > Copy Pre-Build, and edit the copy as needed. Alternatively, if you need to make a once-off change for a specific quote or job, add the pre-build to the quote or job then edit it from there.
Archive or delete a pre-build
When you archive or delete a pre-build, it still appears in any existing jobs or quotes that it has been added to, but is not available to add to new jobs and quotes. If a catalogue item that has been included in a pre-build is deleted, it is removed from the pre-build.
To archive or delete pre-builds:
- Go to Materials > Pre-Builds.
- Select the check boxes for each pre-build you wish to archive / delete.
- Below the table, click Archive / Delete.
- Click OK to confirm.
Activate archived pre-builds
If you need to use a pre-build that has been archived, activate it again.
To activate pre-builds:
- Go to Materials > Pre-Builds.
- Click Advanced and select Archived from the Pre-Build Status drop-down.
- Select the check boxes for each pre-build you wish to activate.
- Below the table, click Activate.
The pre-builds move to the main pre-build table.
Pre-build security group permissions
The areas of a pre-build you can view or edit vary depending on your security group permissions.
If you have been enabled to View / Edit Pre-Builds in your security group, you can access pre-builds outside of jobs and quotes according to the following permissions:
| View only Pre-Builds (Details and Prices) | View all areas of a pre-build, excluding the Catalogue tab. |
| View only (Details only) |
View the Details section of a pre-build including Support Materials, the pricing type, and sell price, as well as the Build, STCs, and Attachments. You cannot view the full Pricing breakdown or the Catalogue tab. |
| Edit Pre-Builds (Details and Prices) |
View and edit all areas of a pre-build, including the Pricing breakdown in the Details tab. You can also change the pre-build's Pricing Type from Standard Price or Flat Rate if it has not yet been used on a quote or job. |
| Edit Pre-Builds (Details only) |
View and edit the Details section of a pre-build including Support Materials, the pricing type, and sell price, as well as the Build, STCs, and Attachments. You cannot view the full Pricing breakdown or the Catalogue tab. |
To assign a specific pre-build permission to a security group:
- Go to System > Setup > System Setup > Security Groups.
- Click the required security group.
- Go to Materials > Pre-Builds.
- Select View / Edit Pre-Builds, then select the required permission from the drop-down list.
- Click Save and Finish.
Learn more in How to Set Up Security Groups.
Walk Me Through
Need additional help?
Try Walk Me Through, our step-by-step guidance tool, to create pre-builds.
In Simpro Premium, go to Help ![]() > Walk Me Through and search Standard Price Pre-Build or Flat Rate Pre-Build.
> Walk Me Through and search Standard Price Pre-Build or Flat Rate Pre-Build.
Learn more in How to Use Walk Me Through in Simpro Premium.
Learn more in the Learning Toolbox
For additional training, complete an interactive material in the Simpro's Learning Toolbox. Learn more in About Simpro's Learning Toolbox.