Last Updated: December 15 2025
How to Set Up Single Sign-On
Overview
Single sign-on (SSO) makes logging into your apps easier - instead of remembering individual passwords for each piece of software you use, streamline your login process.
With Simpro Premium, you can use a single sign-on identity provider, Microsoft Entra ID SSO or Okta SSO.
Simpro uses OpenID Connect (OIDC) as its identity authentication method.
To find solutions for troubleshooting, learn more in Single Sign-On Troubleshooting.
 Manage single sign-on
To manage your single sign-on settings, you need to have the correct permissions in your security group.
- Go to System > Setup > Security Groups > Simpro Security Groups.
- Click the security group to edit it.
- Go to Setup > System and select Manage Single Sign-On. By default, this option is disabled for all security groups.
- Click Save.
Multi Company
Single sign-on (SSO) for multi-company builds can be managed in two ways:
- Shared template: If companies share a template, all SSO permissions must be configured at the template company level.
- Non shared template: With shared/non-shared defaults, SSO must be managed at the template company level. You need access to the template company to manage SSO for the entire organisation.
Pre-requisites to use SSO in Simpro
To use single sign-on:
- All the employees must have a unique primary email address. SSO will not work if the employee has an invalid email and/or duplicate emails within the organisation
- The primary email address of the employee must be the same as their email address in your identity provider (IdP).
To use single sign-on in Simpro Mobile:
- All employees must have set up and enabled Single Sign-On from System Setup in Simpro Premium.
- The primary email address of the employee must be the same as their email address in your identity provider (IdP).
Important note:
- SSO is only available for primary users (employees)
- SSO is not available for Contractors
- SSO can be used on Simpro Premium and Employee portals
- For Multi-company (shared template and non-shared template), SSO can only be set-up from the template company. SSO set-up at the template company will be applied to all companies within the build.
- SSO is available from Simpro Mobile version 13.5, and Simpro Premium must be version 25.2.2 or later.
SSO setup in Simpro Premium

To set up SSO:
- Go to System Setup > Login Auth. > SSO Authentication.
- From the SSO page, click Configure SSO.
- Select your organisation’s identity provider (IdP) from the list of available IdPs and click Next.
- Make a note of the provided Callback URI. Confirm to go to the next step. Further steps on where to copy this will be provided in the respective IdP setup guide.
- For Microsoft Entra ID SSO, learn more in Microsoft Entra ID SSO
- For Okta SSO, learn more in Okta
- After the key IdP details have been provided as per the respective IdP instructions above, click Next.
- Select the Login Type. This option can allow for different user logins:
- SSO Exclusive Login: If the Allow non-SSO Logins? is toggled off, users must log in using Single Sign-On (SSO), and normal Simpro employee login details will not be accepted. We recommend having this setting toggled on initially whilst setting up users to avoid user lock outs due to incorrect set-up or missing information.
- Mixed Login Option: If the Allow non-SSO Logins? Is toggled on, both SSO and non-SSO users can log in. SSO users will use SSO, while non-SSO users can access the build with their regular login details.
- Click Next and click Test Login.
- If the test fails, click Reconfigure Set-Up and re-enter the IdP details again.
- For Test Login, the systems will check the Users Primary Email address and Simpro URI are added to the setup correctly, as well as:
- For Microsoft Entra ID: Client ID, Client Secret and Tenant ID
- For Okta: Client ID, Client Secret and Issuer URI
- If the test is successful, click Turn On SSO. You'll be able to view the SSO setup details on the authentication page.
Once SSO has been turned on, all users will see the new single sign-on option on their login page.
Note that this will also turn on Single Sign-On in Simpro Mobile.
Click Log in via Okta or Log in via Microsoft ID Entra, and follow the login process for your provider.
Log in with SSO
Use SSO
Once SSO is enabled, and the SSO Exclusive option is toggled off, users will now be able to access Simpro Premium and the employee portal using the SSO method.
The next time the user logs into Simpro Premium they will notice a new option to Log in Via Microsoft ID or Okta.
To log in, click the new SSO option, or for non-SSO users they are still able to access using their Simpro Premium employee card login details.
Use SSO Exclusive Login

If SSO has been enabled and the SSO Exclusive option is toggled on. Next time users login they must login using SSO.
Contractors are able are able to login using their contractor card login details.
SSO Authentication Settings
Once the integration is set up, you can adjust your authentication settings in System Setup > Login Auth. > SSO Authentication.
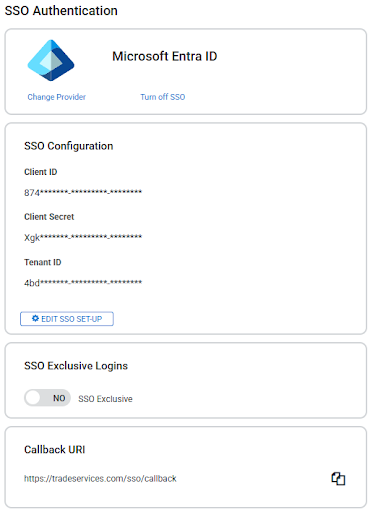
| Change provider | If there has been a change in identity providers, change and reconfigure the provider here. |
| Turn Off SSO | Disable Single Sign-on. |
| SSO Configuration |
Below information of the key details will be listed here, they will be blurred out due to privacy of these details. In the case you need to adjust these key details, users can click on Edit SSO Set-up and enter in the new details.
|
| SSO Exclusive Log in |
Toggle On and Off SSO exclusive to make it so any users are required to log in via SSO. We recommend having this setting toggled off initially whilst setting up users. |
| Callback URI | Displays the Simpro generated URI, Copy the Callback URI if the IdP requires. |